
You’ve found the perfect pattern… but how much cord should you cut? Too short, and it’s a struggle. Too long, and you’re wasting precious material!
This article walks you through how to estimate the right amount of cord step by step — and avoid surprises.
This is the million-dollar question in macramé!
There are general guidelines, but a lot depends on your project: the type of cord, its diameter, the knots, the pattern, and even how tightly you knot.
General Rule of Thumb:
For the lenght
- For a more complex pattern, use 5 to 7 times the final length.
- For a simple pattern, use 3 to 4 times the final length of your project.
Example:
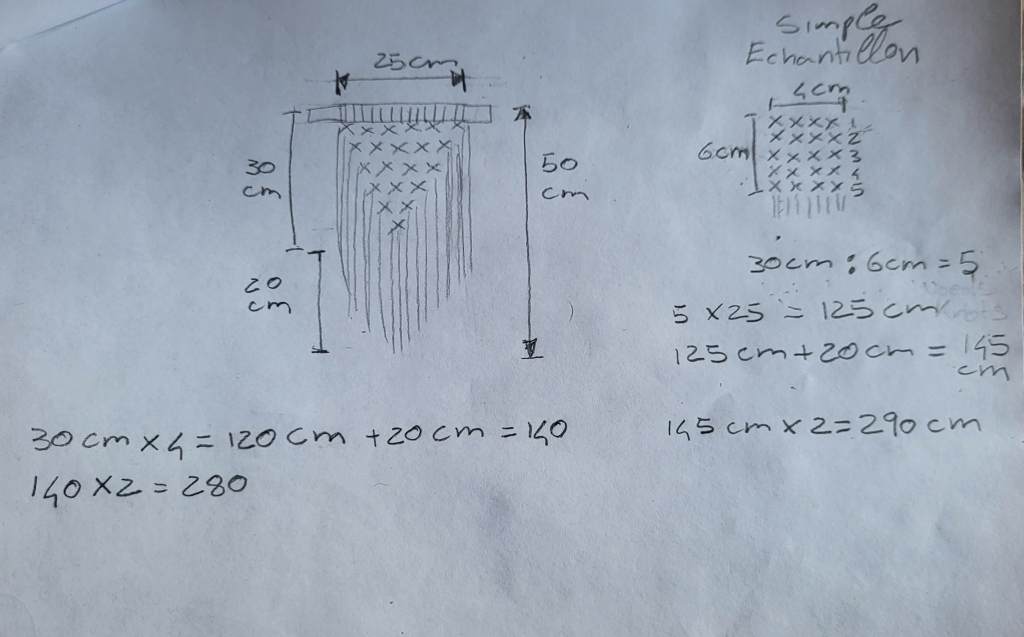
You want to make a small wall hanging, 25 cm wide and 50 cm long.
Out of those 50 cm, 20 cm are just fringe — so 30 cm are actually knotted.
- The pattern is fairly simple, and you’re a beginner, so you multiply:
- 👉 30 cm × 4 = 120 cm + 20 cm for the fringe = 140 cm.
- You’ll attach your cords to a wooden dowel using a lark’s head knot (cords folded in half). So you’ll need to double the total length:
👉 140 cm × 2 = 280 cm.
With a 280 cm cord folded in half, you’ll get two 140 cm strands ready to knot.
Tip: If your dowel is thick (over 8–10 cm), make sure to include it in your calculation!
How to Determine the Width?
The number of cords you’ll need depends on the pattern.
For example, flat (square) knots require groups of 4 strands.
If your pattern uses 6 flat knots:
👉 6 × 4 = 24 cords.
If 24 cords don’t cover your 25 cm width, just add more in multiples of 4 until you reach the desired width.
Alternative Method: Make a Sample
For complex projects, it can be useful to make a small sample.
Cut 8 cords of 50 cm, fold them in half, and tie 4 square knots over a few rows.
Then measure your work.
If 4 square knots = 4 cm wide, and you want 25 cm, you’ll need:
👉 25 square knots → 25 × 4 cords ÷ 2 (since they’re folded) = 50 cords
Now for the length:
If 25 cm of cord = 5 square knots and gives 6 cm of length:
👉 30 cm ÷ 6 = 5 (you need 5 groups of 5 knots to get 30 cm).
Multiply 5 × 25 cm = 125 cm + 20 cm for fringe = 145 cm.
👉 145 cm × 2 = 290 cm.
Analyze the Type of Pattern
Before you calculate, also consider the structure of your piece. Here are a few examples:
1️⃣ Complex pattern with built-in fringe:
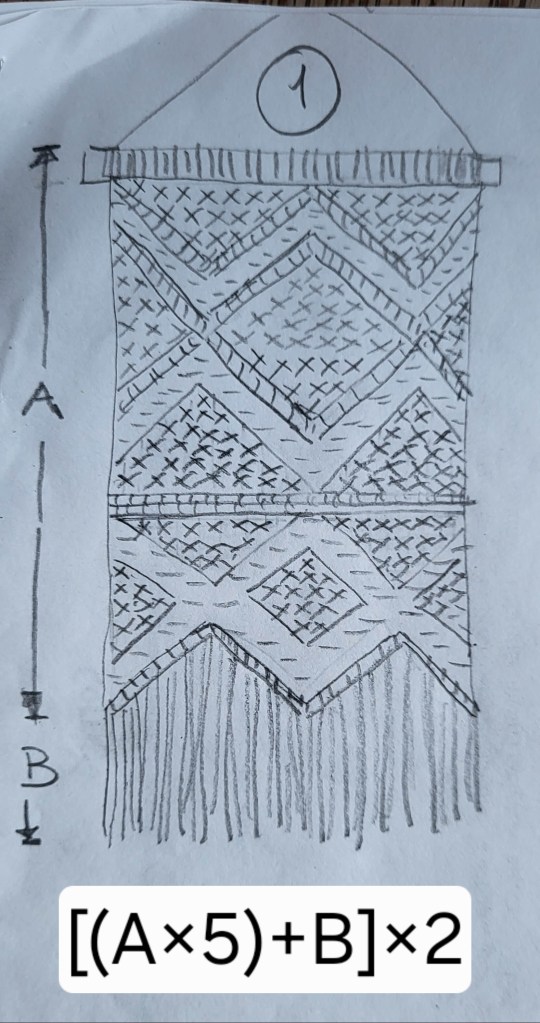
- Take measurement A (knotted length), multiply by 5, add B (fringe), then multiply the total by 2.
👉[(A × 5) + B] × 2= cord length
2️⃣ Complex pattern with added fringe:

- Take A, multiply by 5, and then multiply by 2.
👉(A × 5) × 2= cord for the main pattern. - Then add fringe:
👉 B × 2
3️⃣ Openwork pattern with built-in fringe:
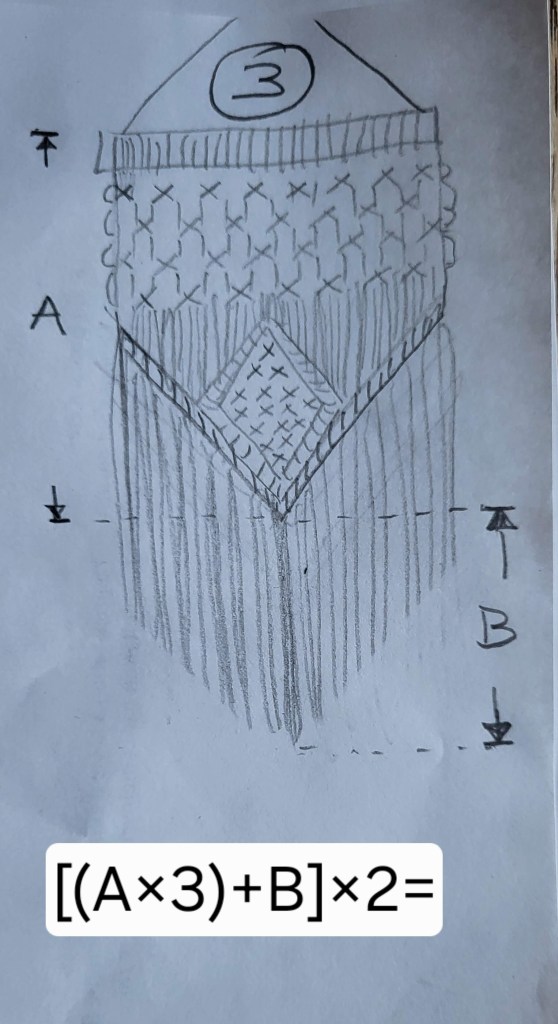
- Take A × 3, add B, then × 2
👉[(A × 3) + B] × 2
4️⃣ Pattern made of lanyards:

- Section 1: simple pattern with built-in fringe
👉[(A × 3) + B] × 2 - Section 2: two sinnet of half-hitch knot attached in the middle (this knot need a good amount of cord) For this knot, you know you need four strands, which means two cords folded and attached to the dowel. You also know that the two middle strands are the guiding (or anchor) cords — their length will be exactly the length you want your lanyards to be. When calculating the cord length, you’ll use this formula:
👉 final length + 4× the final length. - But when folding and attaching the two cords to the dowel, make sure to position them so that the inner strands (the guides) are equal to the final length, and the outer strands (the working cords) are 4 times that length.
👉(A × 5) × 2is the simplified formula - Section 3: two open pattern straps.
👉(A × 3) × 2 - Then add fringe:
👉 B × 2
Bonus Tip: Adjust for Cord Thickness
If you choose a thinner or thicker cord than recommended, use a conversion chart to help you adjust your calculations.
👉 It’s not an exact science, but it’s a great starting point.
✨ « Good news! You can download this chart for free from the Inspirations & Bonus section of my website: www.the-fiber-tryst.com. Just click the button right here! »😊
📚 Tips for Beginners
✅ Always add 10% extra cord for your first projects — it’s better to have too much than not enough!
✅ Track how much cord you use for each type of knot — you’ll get better at estimating with practice. Eventually, you’ll tailor cord lengths for each strand based on its role.
✅ Don’t be surprised if two cords of the same diameter and brand feel different — little variations are totally normal!
With these tips and a bit of practice, you’ll soon be a cord-calculating pro! 🎉
Does all of this feel a bit too technical or complicated? I get it! I don’t know where you are in your macramé journey, but one thing’s for sure — I absolutely don’t want to discourage you. 😊
Here’s what really matters to remember:
👉 In the beginning, you’ll probably be following tutorials with clear instructions and pre-calculated measurements. Just follow along, keeping the beginner tips and general cord rule in mind.
👉 When you start feeling ready to create your own designs, you’ll already have a better sense of how you knot and how much cord you use.
👉 At that point, come back to this article, take time to analyze your pattern, trust yourself… and remember: making a small sample is always a great idea!
✨« Need a spark of inspiration?
Head over to the Inspirations & Bonus section on my site: www.the-fiber-tryst.com. »— or subscribe to my newsletter to download the Free Guide: 3 Simple Macramé Projects to Try Today. Just click here! »


Laisser un commentaire